
Managing User Permissions
Each user in your system can be set up with a specific level of access, or permissions. This is in addition to the user type that is set when they are created. The permissions control what bits of the Schudio system they are able to access and use to edit the content on the website.

On the Users page, any previously added users will be listed. To manage a user's access permissions, click the padlock button in the action column of the user to manage.

On the permissions page, all of the sections of the system are visible. It's best to only give access to the sections and items that are required. Tick the boxes that are required and the user will be able to access them when they log in to their account. For example:

To manage the pages a user can access, the pages option (towards the top) must be ticked and the permissions saved. After saving a user with the pages option ticked another option is added to edit their permissions. "All Pages" (at the bottom of the screen) Unselecting the all pages option will show all of the pages that exist in the system and per-page access can be given.
Turning on a section doesn't mean that a specific feature will work. For example, turning on applications does not enable the application form system - each application form has to be built and set up to requirements. If you are interested in an application form on your website, please get in touch for a quote.
How to Enable Content & Blog Comment Approval for a User
Overview
You can now control whether individual users require approval before their content or blog comments are published to your website.
By enabling these approval settings, any content or blog comments created by that user will be sent for approval before they are made live, helping you maintain quality and oversight of your website's content.
How to Enable Approval Settings
- From your Dashboard, navigate to the Users area of your website.
- Select the user you would like to update.
-
Within the user's profile, scroll to the Reminder Settings section.
You will now see two new approval options:
- Content Approval
- Blog Comment Approval
-
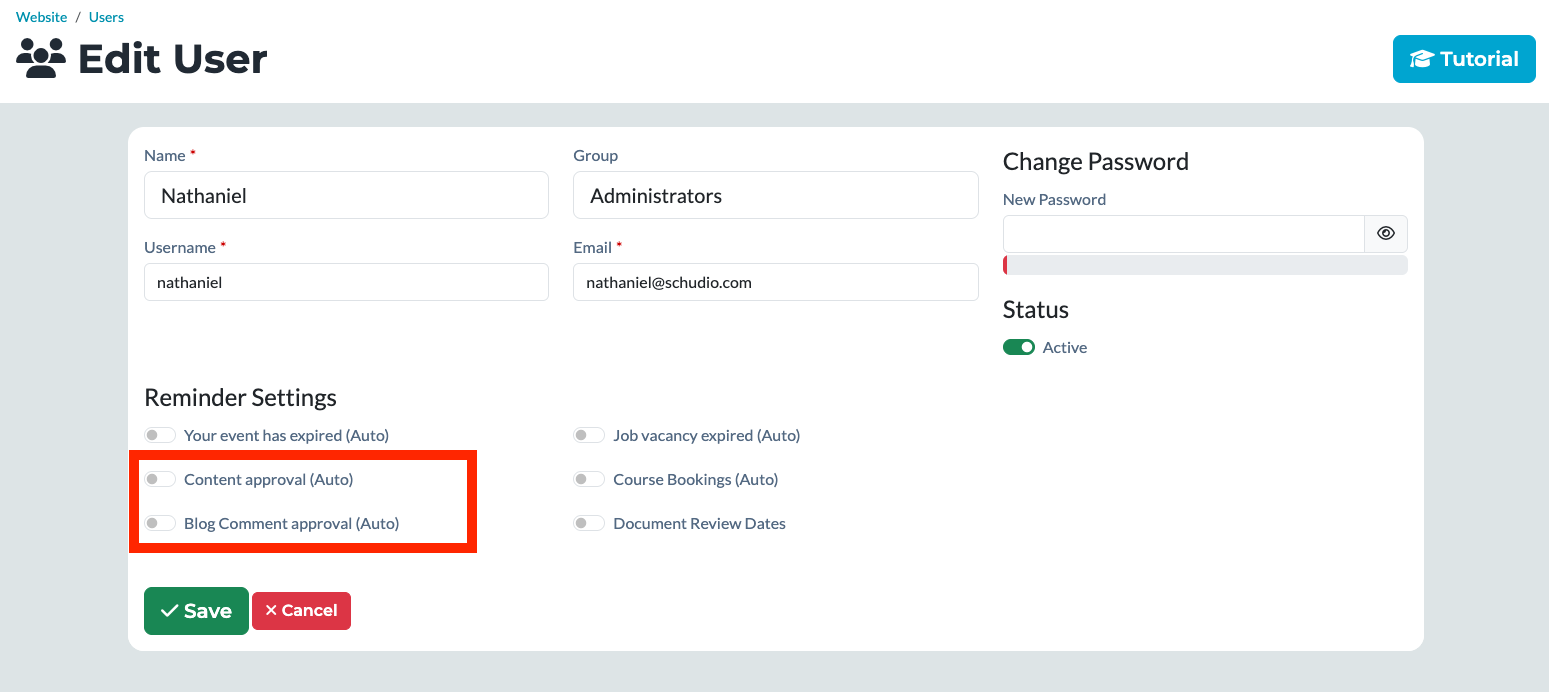
- Enable either or both toggles depending on the level of approval you require.
- Save your changes if prompted.
What Happens Next?
Once enabled:
- Content Approval – Any content created or updated by that user will require approval before it is published to your website.
- Blog Comment Approval – Any blog comments submitted by that user will require approval before they become visible on your website.
The approval requests will be sent to the relevant approval areas within the CMS, allowing authorised users to review and approve them before publication.
Troubleshooting
I can't see the approval options
If the Content Approval and Blog Comment Approval toggles aren't available, your website may not yet have access to this feature or you may not have the necessary permissions.
Please contact our support team at support@schudio.com, and we'll be happy to help.
Best Practice
Content approval is particularly useful if you have multiple staff members contributing to your website. It allows users to continue creating content while ensuring that an authorised reviewer can check everything before it goes live.